Sunday, June 8, 2014

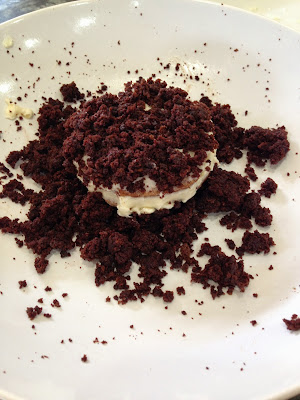
Ube Roll Cake (Purple Yam Cake)


It's been awhile since I tried Ube Cake. To make this you need the ube or purple yam. You can get it on Asian stores, it can either be frozen or in powdered form. It is also freshly available if you want. Save yourself the trouble, it's better if you just use it in powdered or frozen form. So I have some powdered ube (purple yam) and I really want to try how it is compared to frozen grated ube, and I would say I like it better. You just have to rehydrate the powdered ube first before using it. Use 1 cup water with every 30 grams powdered ube. For this post, I used the cream cheese frosting. I didn't have photos this time but I will do it next time, watch for it! So let's start baking!


Ingredients:
(A) EGG WHITE MIXTURE
4 egg whites
1/3 tsp cream of tartar
1/4 cup sugar
(B) 
4 egg yolks
1/4 cup vegetable oil
1/4 cup milk
20 ml ube flavor (McCormick)
1/4 cup ube
(C)  CAKE BATTER MIXTURE
1 cup cake flour
1/4 cup granulated sugar
1 1/2 tsp baking soda
1/2 tsp salt

Frosting:
2 cups heavy cream
8 oz cream cheese
1/2 cup granulated sugar
1 tsp vanilla extract

 Procedure:
1. Preheat oven to 350 degrees F. Line jelly roll with parchment paper. DO NOT GREASE!
2. In a bowl, whisk egg whites until frothy. Then, add cream of tartar.
3. Gradually, add 1/4 cup sugar beating on high speed till it forms stiff peak. Set aside.
4. In another bowl, combine all the liquid ingredients(B). Set aside.
5. In a mixing bowl, combine all dry ingredients (C).
6. Pour in the liquid ingredients (B) to the flour mixture(C). Mix it until light and fluffy.
7. Using a spatula, gently fold in the egg whites mixture into the cake batter mixture.
8. Pour in the prepared jelly roll pan, and smooth top with a scraper or spatula.
9. Bake for 20-25 minutes. Cake is ready when inserted toothpick comes out clean. 
10. Remove from oven. Place cake on sugared towel or waxed paper. ***Make sure you use clean towel that does not have a detergent scent otherwise that scent will be transferred to your cake! Then maybe just use waxed paper.***
11. With the parchment paper on top, slowly peel it off.
12. Roll the still warm cake with the towel or waxed paper lengthwise. Let it cool on a wire rack.
13. Unroll the cake and remove the towel or waxed paper. Slice the 2 ends of the cake. Crumble and set aside.
14. Spread the frosting on the cake and roll the cake, frost the outside too. See frosting recipe below!
15  Sprinkle the crumbled cake around the frosted cake until covered. Keep it in the refrigerator for 2 hours and serve. Enjoy!


Cream cheese frosting:
  • Combine cream cheese, sugar, and vanilla extract in a large bowl.
  • With the whisk attachment, mix on medium speed until smooth.
  • While whipping the mixture, slowly pour in the heavy cream. Continue mixing until the cream reach a stiff peak.


Friday, May 30, 2014

Pianono Recipe/Swiss Roll


Welcome to this site! I have another easy recipe worth sharing. Pianono is a Filipino cake roll and you can use any fillings you like (jelly, fruit jam or whipped cream). Some call it Swiss Roll or Jelly Roll. For this recipe, I will stay with the easy filling possible and my favorite too. I grew up loving this for my snack. The ingredients I am sure it is in your kitchen, you just need margarine and sugar, how easy and simple can it be. My son being a picky eater likes it, so I am hopeful you will like it too.


Ingredients:
6 eggs separated
6 tbsp sugar
6 tbsp sifted flour
1/3 tsp cream of tartar

Procedure:
1.Preheat oven at 400°F.
2. Beat the egg whites with the cream of tartar until it is stiff.
3. Slowly add the sugar one tbsp at a time.
4. Beat the egg yolks and add them to the egg whites at a slow speed.
5. When it is completely incorporated, remove the bowl from the mixer and fold in the sifted flour one tbsp at a time.
6. Pour into a jelly roll pan lined with parchment paper.
Bake for 12-15 minutes at 400°F.
7. remove from oven and let the cake cool.
8. Remove the parchment paper lining.
9. Spread your favorite filling over the cake and roll.
10. Dust it with granulated sugar and slice crosswise.


Wednesday, May 28, 2014

Inipit Recipe


This is a re-post from my other page...Inipit translated to English means "pressed", is a flat sandwich pastry that originated from Malolos, Bulacan. Inipit is two slices of sponge cake with custard filling in which Eurobake is known for. It started as Panaderia La Concepcion in 1945 in San Vicente, Malolos. The original inipit was introduced to the public by the late Salome P. de Ramos. The recipe of the original inipit is a well-kept family secret. So, I am on a quest to find the best inipit recipe that will be close to the taste of how I remembered it from La Concepcion from San Vicente, Malolos. That is how I was introduced to this delicacy back in the nineties. I have found three different recipes for the filling so far, and I have tried one, it taste good but I feel that I might tweak the recipe next time. I'll post the recipe for now but I am determined to come close to the taste of Eurobake as I go along and will definitely update this post too...Promise! I hope you guys will enjoy it just like we do.


Ingredients:
Sponge Cake
     Flour Mixture
  •  1 cup all purpose flour
  •  1 tsp baking powder
  •  1 cup sugar
  •  1/4 tsp salt
     Egg mixture
  • 6 egg yolks
  • 4 tbsp. evaporated milk or whole milk
  • 1 tsp vanilla
     Meringue
  • 6 egg whites
  • 1/4 tsp cream of tartar
  • 1/2 cup sugar
     Filling
  • 1/2 can evaporated milk
  • 1/2 can condensed milk   
  • 4 egg yolks
  • 1/4 cup all purpose flour
  • 1/4 cup sugar
Procedure:
1. Preheat oven to 325 degrees Fahrenheit. Grease and line two pans.
2. Sift and mix the flour mixture. Set aside.
3. For the egg mixture, beat the egg yolks until light in color. Add milk and vanilla. Set aside.
4. To make the meringue, beat the egg whites and cream of tartar in a separate bowl until they form soft peaks. Add the sugar and beat till it form stiff peaks.
5. Pour the egg mixture into the flour mixture thoroughly and mix well making sure the batter is free of lumps.
6. Fold the batter to the meringue.
7. Pour over prepared pans and bake each for 15-20 minutes. ( Check for doneness, when inserted toothpick comes out clean).
8. Let the cake cool completely.
9. Make the filling; in a saucepan, cook the filling mixture over low heat and stir constantly till it reach a thick spreadable consistency. Let it cool completely.
10. Assembly:
  • Invert the cake and remove brown crumbs
  • Spread the filling on one of that cake and place the other cake on top to  make the inipit just like a sandwich.
  • Brush the top with melted butter and sprinkle with sugar.
  • Cut into desired sizes.

Thursday, May 22, 2014

Lego Head MallowPops Tutorial


We celebrated our son's birthday and it was themed Lego Movie. The kids had fun and my son is now planning his birthday for next year, I wonder what it will be! We actually looked on Pinterest and browse different Lego cakes and I would say letting him decide on what cake he wanted was such a pain because at his age he already know what he wanted. I know this year's party will be hard to top in the coming years, so we'll see. As we browse for cakes and candies and everything  for a Lego Party, I saw these Lego Heads and I knew right along these will be perfect addition for our dessert table. Many mistakenly thought these were cake pops. These are MallowPops! Yes, these treats are easier to do than cake pops. And for this post, I have a tutorial on how i did them. Hope you find them useful for your next party! 

Jet Puffed Marshmallows, Jet Puffed Stacker Marshmallows,
 Yellow Candy Melts and Lollipop Sticks

Use a small round cutter to make the Lego Head

Put the lollipop stick in the center of marshmallows

Put a bit of melted candy melts on top of the
marshmallows

Let it dry

Dip the marshmallow now on the candy melts

Tap off excess candy melts. Rotate side to side,
 up and down to cover the marshmallow completely 

Let it dry again

Use edible marker to draw the face

Different faces I used to decorate
these Lego Heads

Wednesday, May 21, 2014

Sambos Cookie Recipe


Since I got so excited doing Silvanas, why not do the Sambos too? The recipe is about the same as the Silvanas but I did tweak it a little and added more photos as a guide to everyone who wanted to try this it. I wanted it to look like the Sambos from Brownies Unlimited but the meringue kept getting flat once I put them on the parchment paper. It could be because I did not use the flour which I saw on another recipe but I want the taste already so I just kept going. I found that the round Sambos look more appealing than the oval, so for my future baking of these goodies I'll stay with the round ones. I have the photos of the ingredients, it is up to your preference on what brand you want to use. You can also see from the photo guide that I used the stand mixer, way easier and faster to do the meringue but again the handheld mixer worked okay too.


 Ingredients:
6 large egg white
1 tsp  cream of tartar
1/2 cup granulated sugar
1 1/2 cup cashews
1 cup salted butter
1 cup sifted confectioner's sugar
1/2 cup milk
chocolate cake crumbs

    How to make the meringue
1. Finely ground cashews in the food processor or
your coffee grinder. Set aside.
2. Beat eggwhites and cream of tartar in the mixer.

3. Gradually add the granulated sugar, and beat till
 it forms a stiff peak.

4. Fold in the ground cashews in the meringue.


Until all the ground cashews were mix with
 the meringue.
5. Transfer the meringue into piping bag.
You can pipe it into oval shape in a cookie
sheet lined with parchment paper.

Or you can also do round shape whichever you prefer.
6. Then bake at 300 degrees Fahrenheit for 25-30 minutes
 until it's golden brown.
7. Once out in the oven, let it cool completely and
 remove gently form the parchment paper. Set aside.

How to make the Buttercream
1. Beat the softened butter until it is creamy.


2. Add the confectioner's sugar gradually.


3. Then add the milk till fully incorporated. Set aside.

Now, for the assembly of your Sambos
1. Spread the buttercream on 2 meringue wafers making sure
the flat sides are facing out. Then, cover all sides with
 buttercream.


2. Roll the wafer on chocolate cake crumbs on one side


3. Then roll it on the other side too.


4. Until it's fully covered with chocolate cake crumbs.
5. Refrigerate before serving.


Hope you'll find this photo guide useful, enjoy Silvanas and Sambos my style with your favorite drink! For me, it's my cup of coffee.  If you see this posted on another blog...yes they were the same! I am re-posting all sweet treats recipes on this site. Thanks, again!


Tuesday, May 20, 2014

Silvana Cookies/Sylvanas...My Style


I am just re-posting this recipe from my other blog. It's one of my favorite dessert back home. It was nice to know that we can say that this is the Filipino version of French macarons. Years ago, I actually like the Silvanas from Jonis, not even sure if they are still around. Anyway, I have searched a lot of Silvanas recipe and found three worth trying. So off to the first one, I find this easy to follow if you already have some experience or knowledge about baking. Word of caution, it is time consuming meaning a lot of work and can get messy in the kitchen. But in the end, it's all worth the effort because it taste so good. I also tried using handheld mixer here to check if I can come out with the same outcome. Yes, it was a success but it took longer for the meringue to form a stiff peak or it could be the humidity because it was raining all day. It took me 3 hours from preparation to baking and assembly. Hope you'll enjoy this recipe...

Ingredients:
6 egg large whites
1 tsp cream of tartar
1 cup salted butter
1 cup sifted confectioner's sugar
3/4 cup granulated sugar
1/2 cup milk
1 3/4 cup cashew nuts
cake crumbs

Meringue
1. Finely ground cashew nuts in the food processor and set aside.
2. Beat egg whites and cream of tartar in the mixer.
3. Gradually add the granulated sugar, and beat till it forms a stiff peak.
4. Fold in the ground cashews.
5. Transfer the meringue in a piping bag.
6. Pipe the mixture into oval in cookie sheets lined with parchment paper.
7. Bake at 300 degrees Fahrenheit for 25 to 30 minutes until golden brown.
8. Once out in the oven, let it cool completely and remove gently from the parchment paper. Set aside.

Buttercream
1. Beat the softened butter until creamy.
2. Add the confectioner's sugar gradually.
3. Then gradually add the milk.

Assembly
1. Spread the buttercream on 2 meringue wafers making sure the flat sides are facing outside.
2. Cover all sides with buttercream.
3. Roll the wafers in cake crumbs.
4. Refrigerate before serving.

***you can also keep them in the freezer for storage and thaw in the fridge before serving

Sunday, May 18, 2014

Lego Movie Cake


Hi everyone...Just want to share this page to those who love sweet treats. Enjoy browsing and I will try to upload more as I go. For my first post here regarding sweet treats, I am sharing a tutorial on how I made this figure for my son's seventh birthday. The inspiration is Lego movie with Emmet as his cake topper. It is not detailed as much but I am hoping you get the idea or I may be able to help just send me questions. Thanks!

Materials used:
RKT
Fondant
Gel colors (orange, yellow, blue, brown and black)
Bamboo skewer

Procedure:
1. Print desired image to how big you want your topper
2. Start molding your RKT ( I made cutouts of the image, part by part so I have the exact size of everything).
3. Cover everything in white fondant first to smoothen the RKT.
4. Mix gel color to the white fondant to get the color you needed.
5. Then, cover every part accordingly.
6.  Use dowels to support the structure, it can get really heavy as you add fondant to the RKT. ( I used bamboo skewers here).
7.  Attached the hair to the head, I used a Wilton tool to create the grooves on the hair.
8. Details, I spend a lot of time to these because they were all hand cut. I call it the final touch.


Hope you like it!!!